I measured S the other day. She just keeps growing, and I was curious about her size now that she’s five. She’s a particularly long and lean kid, so I wasn’t surprised to find out that her waist, chest, and hips measure a size 3 while her height measures a size 5.
Chances are you’ve faced a similar issue. You’re ready to sew for your child (or yourself), but the body that will be wearing the garment doesn’t have the same measurements as the sizing chart on the pattern envelope.
Not to worry. It’s easy to make pattern adjustments to accommodate these differences. I’ve put together a little tutorial to show you how.
Picking the correct splicing spot
First, assemble all the pieces you’ll be lengthening or shortening. It’s important to make the same changes to all the matching pieces, so be sure you’ve got the pieces for the front and the back of the garment.
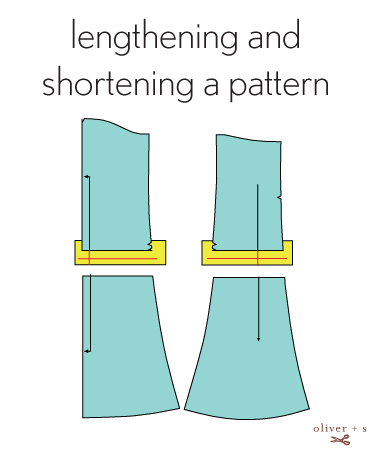
In general, the best location for lengthening or shortening a dress or shirt is halfway between the bottom of the armhole and the hem. For pants or a skirt, the best spot is halfway between the rise/crotch and the hem.
Here are a few illustrations showing (with a horizontal line) the recommended lengthen/shorten locations for some of our patterns.


By adding or subtracting length in the middle of the piece, you won’t affect the hem or the general silhouette as much as you would if you added to the bottom of the piece. However, use your best judgment here. Depending on the style, you might want to pick a slightly different place to do your splicing.
I prefer to lengthen or shorten at a notch (when a notch is available) so that I can be sure to position matching or opposing pieces at the same location. For example, on the Tea Party Sundress, I lengthened the lower of the double notches. Don’t forget to do this for all the pieces involved: front and back!
When you’ve selected the spot at which you’ll make your splice, draw a line on the pattern piece at the spot. The line should be perpendicular to the grain (or fold) line at the point where you want to lengthen or shorten the piece. Remember: draw this line at the same position on all the pattern pieces you’ll be changing.
Then, starting with one piece, cut the pattern along your line to divide it into two separate pieces.
To lengthen
To add length to a pattern piece, tape a strip of paper under one of the two pieces, and extend the grain line (or fold line) across the strip of paper as in the illustration below.
Draw a line parallel to the cut edge of the pattern piece, marking the amount of length you want to add. For S, I usually add between one and two inches, but it’s a good idea to refer to the Finished Garment Measurement chart on the back of the pattern envelope so you know how long the original pattern will be when it is finished. This will help you to decide how much to add or subtract from the piece.

Tape the other part of the pattern to the line you drew. Be sure to match the extended grain line, even if the sides of the pattern don’t appear to match.
Finally, draw the edges of the pattern piece onto the strip of paper you inserted. You’ll need to draw either a straight line or a curve. If the edge is straight, simply connect the two sides of the original pattern piece with a line. If the edge is curved, you may need to blend the edge, subtracting a bit from one line and adding to the other. Use your eye to extend the curve so it looks blended with the rest of the pattern edge as in this illustration.

To shorten
To shorten a pattern, fold the pattern piece back on itself to remove the extra length and tape the pieces together, again maintaining the grain or fold line.
Redraw the sides, blending any curved lines to make a continuous curve just as you would with a lengthened piece.

Again, don’t forget to make the same adjustments to all the pattern pieces, both front and back. There’s nothing worse than forgetting to add length to part of the pattern.
This is great information, thank you for this post!
I bet your site meter will be off the charts with all the links you’ll get from this tutorial alone. Perfect, perfect.
Thank you so much for this post.
I have twin four year old daughters who are about the height of a six year old so we always run into trouble with length (of sleeves, legs and bodies).
Our 18mth old daughter is heading the same way too.
This is invaluable informationfor me.
This is such useful information – I would always just have added/subtracted a few inches at the hem. Thanks again – clear and easy to follow as always.
This is great because I am planning on making a bigger size of the Bubble Dress; my daughter’s favourite! The size 4 I did last summer seemed short so was planning on making the next size and then lengthening.
Like Karen, also encounter same size problem with my twins (boy and girl). Thanks for this helpful info.
Wow, so helpful! Thanks!!
Thank you! Thank you! I love your patterns and how much I learn through them and your blog. I appreciate this info and your eloquent teaching style greatly!
THANK-YOU! I also have long, lanky children. I will put these tips to good use!
This is wonderful! Thank you so much. I really appreciate you taking the time to make this tutorial. I have a tall dd, so this information will be used.
thank you! my daughter is 4 years old, but a 6 in length. my son is 2, but a 4 in length. they’re both skinny minis like your daughter. we will totally be using this when we’re making up their spring wardrobes. xoxo
Oh. My. Goodness. You just saved my renn faire costume. I am really “short” by normal standards (1,5 meters) Personally, all the patterns seem to me to be made for you lovely, willowy freaks of nature that are over 1,7 meters. Thanks again! Love love love the tutorial.
Hello,
I am interested in lengthening the puppet show shorts. Meaning, giving them a bit more length in the leg. Not the waist to crotch area. Do you have a suggestion for where to cut and add length to these? Because of the curvature of the bottom of the pattern piece #11, I am unclear as to how to go about this.
Thanks so much.
wow. so brief nd understndable. wont the side seam be afffected
Thank you so much for posting this! My daughter is 9 now, but SUPER tall and willowy (takes after her dad’s side!) Her chest and hip measurements put her in a size 4/6, but her height puts her in 12. I was crossing my fingers that you’d have instructions on how to adjust patterns and as always, you didn’t disappoint! By looking at all her measurements, printing and cutting out sizes, and taping them onto her, I’ve settled on using a size 8 pattern and adjusting that for length. She’s in desperate need of a summer wardrobe so I’m going to just sew her muslins from my “pretty but cheap” fabric stash and let those experiments be her everyday/barn clothes. Once I’ve worked out the bugs, I’ll use “the good stuff” for best. Thanks a million!
I want to add length to a midriff piece that is cut on the bias. Does this change the “straight of the grain” angle of the original piece?